Home / All Recipes / Japanese / Marbled Loaf Bread
Marbled Loaf Bread
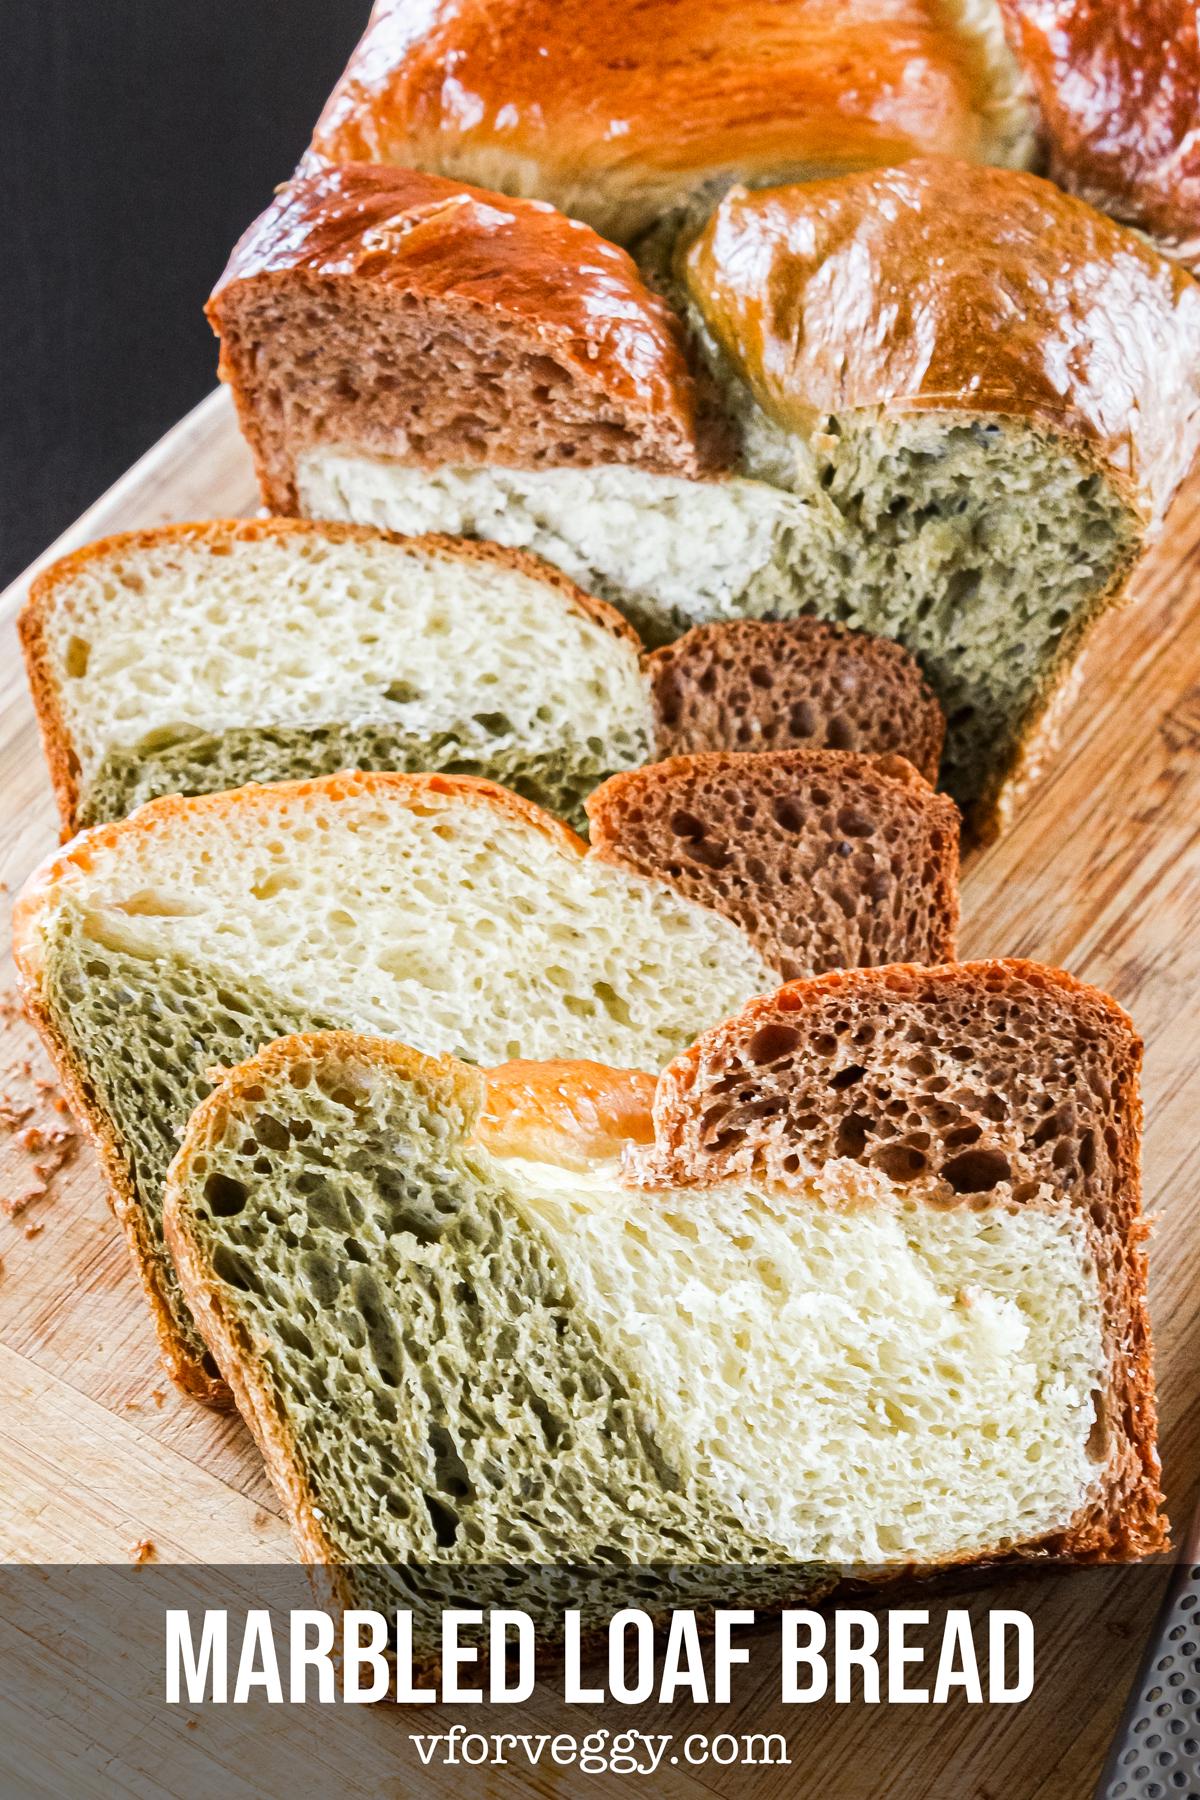
Today I have a simple and fun bread recipe to create a three color marbled loaf bread. You don’t need to worry about artificial food coloring since all the color is natural: white (original dough), green (dough with matcha powder), and chocolate (dough with cocoa powder). You can always play around with the color and come up with fun color pairs.
Prepare the bread dough
I think this is a very simple bread recipe that is suitable for beginner bread makers. First, mix warm milk with yeast and sugar and wait until foamy, about 15 minutes. Meanwhile, whisk together bread (or all purpose) flour, sugar, and salt in a mixing bowl. Once the yeast solution is ready, make a well in the flour mixture, break one egg into the well, and pour the foamy yeast solution. Knead until soft and elastic, try not to add additional flour if possible unless the dough is super tacky, even then, try adding 10 gram by 10 gram. If you persist, it is quite possible that at around 10 minutes mark, enough gluten should have formed and the dough should be non-sticky at this point. Add butter and knead again until the dough is not oily, probably another 10 minutes.
Color the bread dough
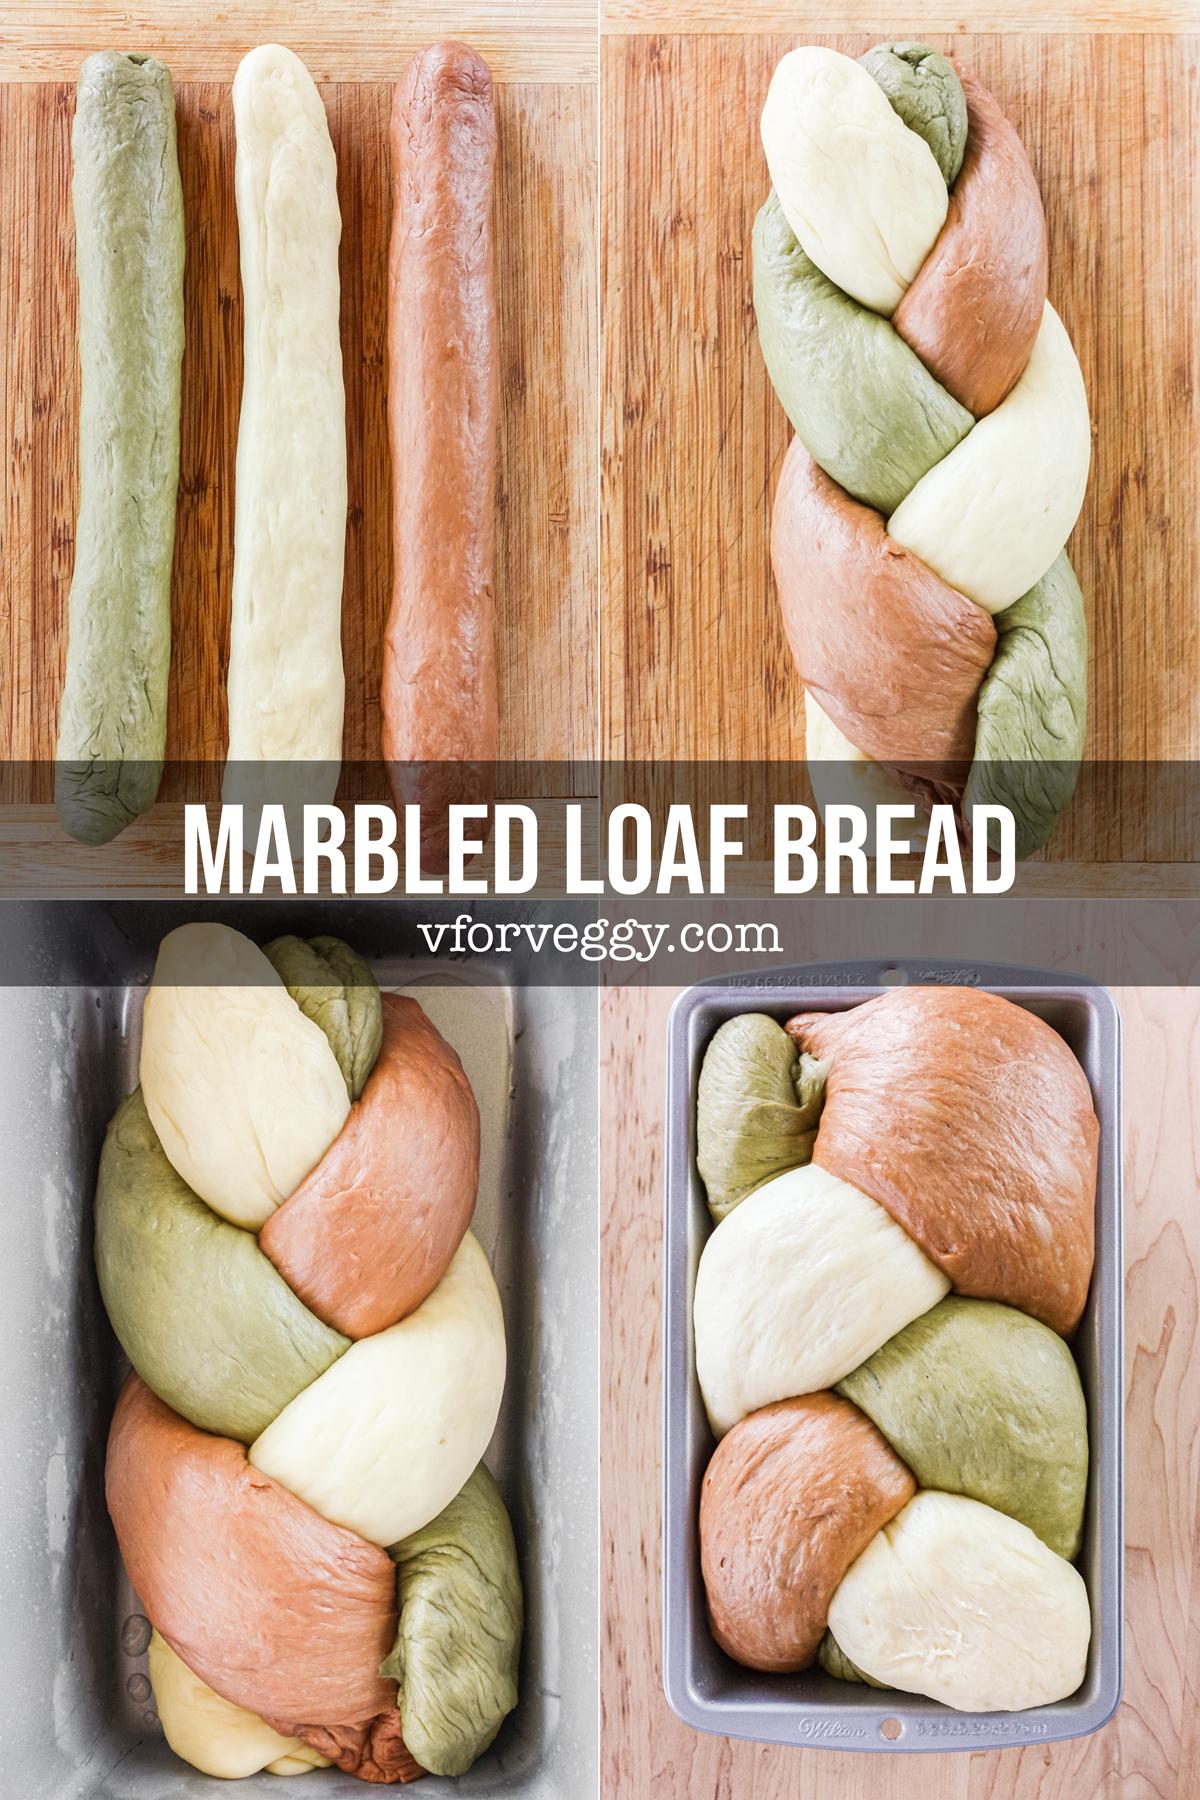
To create the three color look, divide the bread dough into three portions and do the following:
- Leave one portion as is.
- Make matcha paste and add to one plain portion of the dough and knead until the green color is uniform.
- Make chocolate paste add to another plain portion of the dough and knead until the chocolate color is uniform.
At this point, you should have 3 portions of dough, one plain, one green, and one chocolate. Shape each portion into a ball. Place in a large plate (or a baking tray) lined with parchment paper, try to space them apart, so when they proof (about 1 hour), they don’t end up touching each other so the color doesn’t transfer from one dough to the other. Cover with a wet kitchen towel or a saran wrap. Proof until the volume is doubled, about 1 hour.
Braid the bread dough
Grease a loaf pan with butter or oil. Punch each dough to release air bubble, knead again for 2 minutes, then shape into a log slightly longer than your loaf pan. Place the three dough logs side by side, then braid the three logs of dough together. Place the braided dough into the greased loaf pan. Cover the pan with wet kitchen towel/saran wrap. Proof again until the dough rise to the top of the pan, another 1 hour.
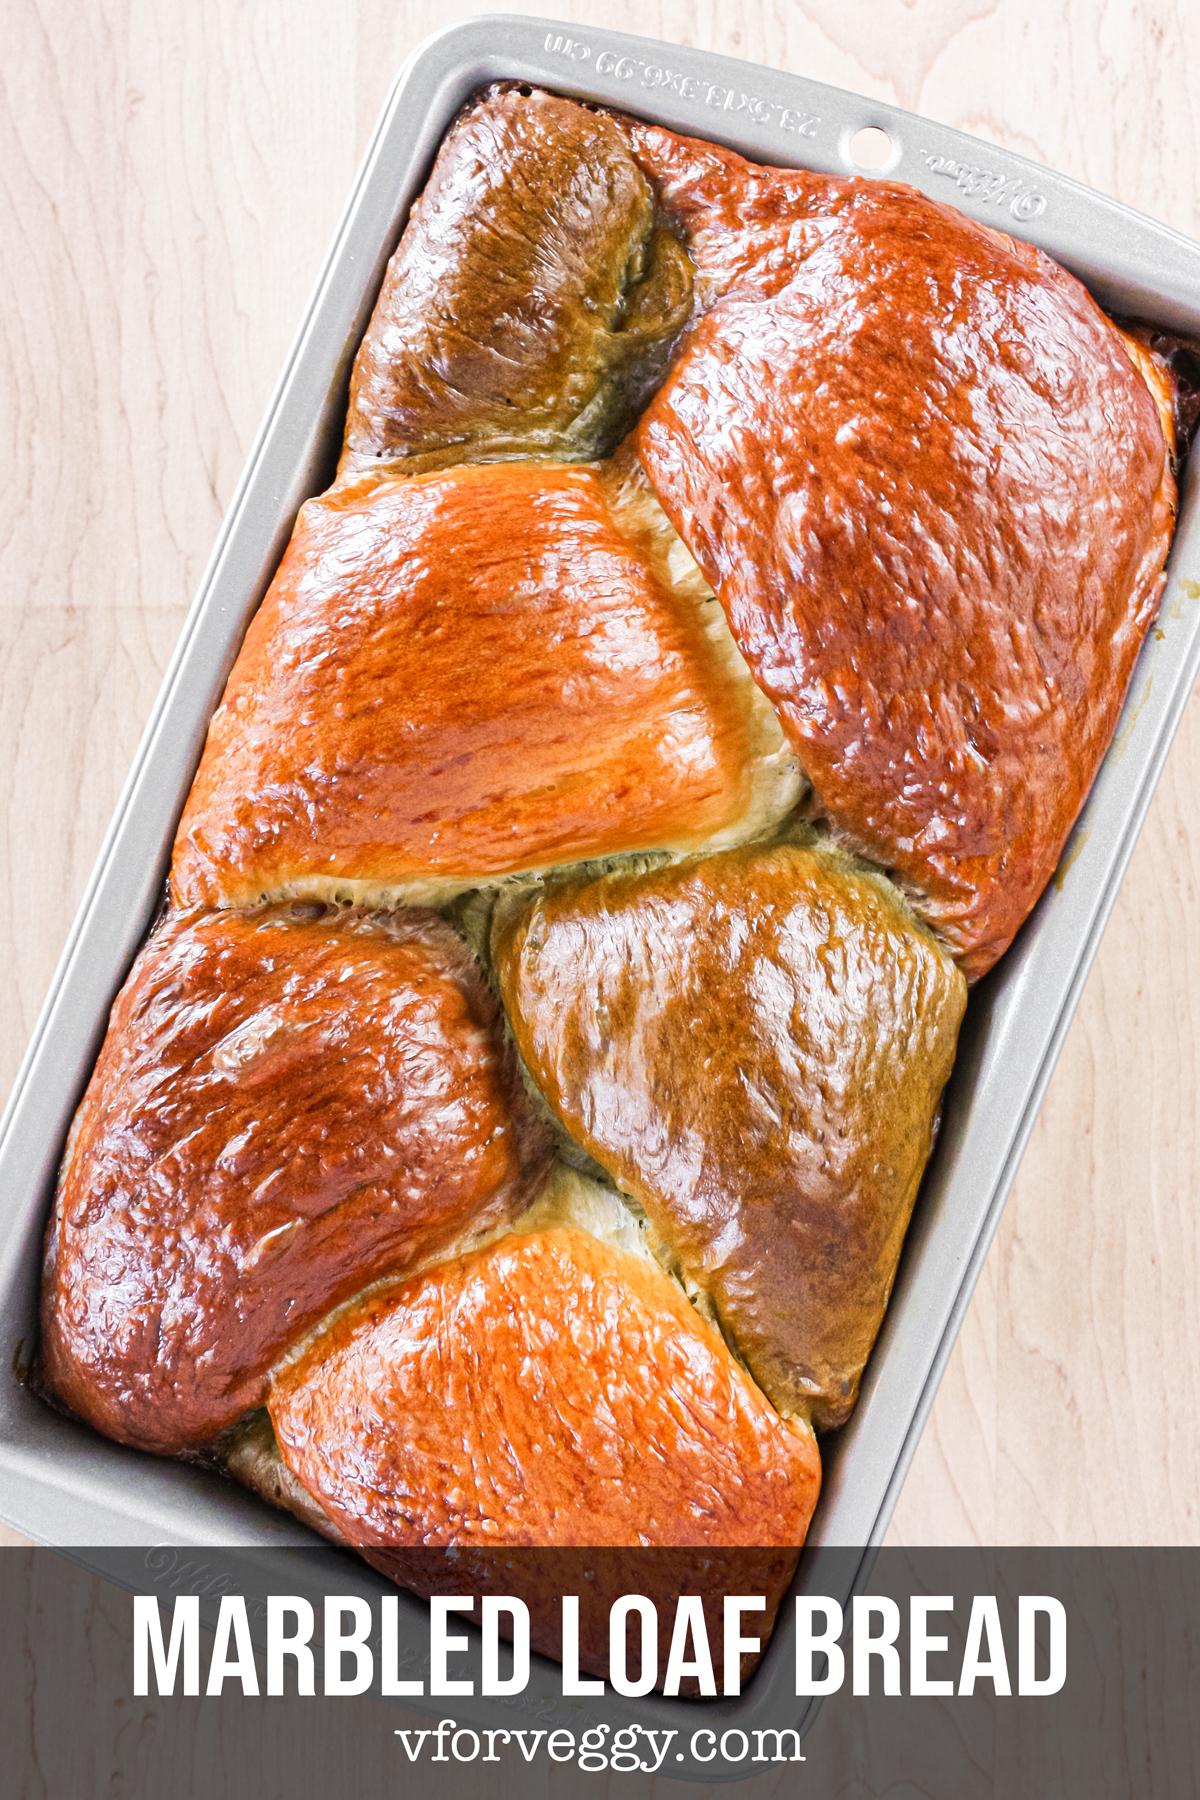
Bake the bread
Preheat oven to 180 Celsius (350 Fahrenheit). Mix together one egg and one teaspoon of water/milk to make an egg wash. Once the dough has finished proofing inside the pan, brush the top with egg wash. Bake in preheated oven for 40 minutes. Usually, I tent the bread with aluminum foil at 25 minutes, so the top of the bread won’t become too browned (or even charred). This step is optional of course, and it will probably depends on each individual oven. But at 25 minutes, take a peek, and if you like the golden brown color at this point, I highly suggest cut a piece of aluminum foil, and place it on top of the bread. If at 25 minutes your bread hasn’t developed a pretty golden brown color, then no need to tent your bread.
Marbled Loaf Bread
Ingredients
- 150 gram warm milk (38 Celsius or 100 Fahrenheit)
- 4 gram active dry yeast
- 5 gram sugar
- 300 gram bread (or all purpose) flour
- 25 gram sugar
- 4 gram salt
- 1 egg
- 30 gram unsalted butter (*)
- matcha paste (5 gram matcha + 2 teaspoon water)
- chocolate paste (5 gram cocoa powder + 2 teaspoon water)
- egg wash (1 egg + 1 teaspoon milk/water)
Instructions
- Mix together warm milk, active dry yeast, and 5 gram sugar. Let it sit until foamy, about 15 minutes.
- Whisk together bread (or all purpose) flour, 25 gram sugar, and salt (if using unsalted butter) in a mixing bowl.
- Once the yeast solution is foamy, make a well in the flour mixture, crack the egg into the well and pour the yeast solution. Knead until soft, elastic, and non-sticky. If the dough feels too tacky (sticky), add a bit of flour (@10 gram increment). It is common for yeast dough to be tacky at first, but if your persist, at about 10-15 minutes of kneading time, the dough should have formed enough gluten to make it more elastic and less sticky. So try not to add flour at the very early stage of kneading.
- Add butter into the dough, knead again until the dough is not oily. It should take another 10-15 minutes.
- Divide the dough into 3 equal portions. Keep one portion plain. Take one portion and add matcha paste, knead until the dough has a uniform green color. Take the last portion of dough and add chocolate paste, knead until the dough has a uniform chocolate color. Shape each portion into a ball. Place in a large plate (or baking tray) lined with parchment paper, set them aside from each other so they don't touch and transfer color from one dough to another. Cover with a wet kitchen towel/saran wrap. Proof until the volume is doubled, about 1 hour in a warm kitchen.
- Grease one 9" loaf pan with butter/oil.
- Punch each dough to release air bubbles, and knead for 2 minutes. Shape each dough into a log slightly longer than the length of loaf pan.
- Place three logs of dough side by side and braid. Place the braided bread dough into the greased pan. Cover pan with a wet kitchen towel/saran wrap, and proof again until the dough rise to the top of the pan, about 1 hour in a warm kitchen.
- Preheat oven to 180 Celsius (350 Fahrenheit). Brush the top of the bread dough with egg wash. Bake in preheated oven for 35-40 minutes. If the bread already develop a pretty golden brown crust before 35-40 minutes (this is usually around 25 minutes in my oven, yours might be different), tent the bread with a piece of aluminum foil so the final top crust won't be too browned (or even charred).
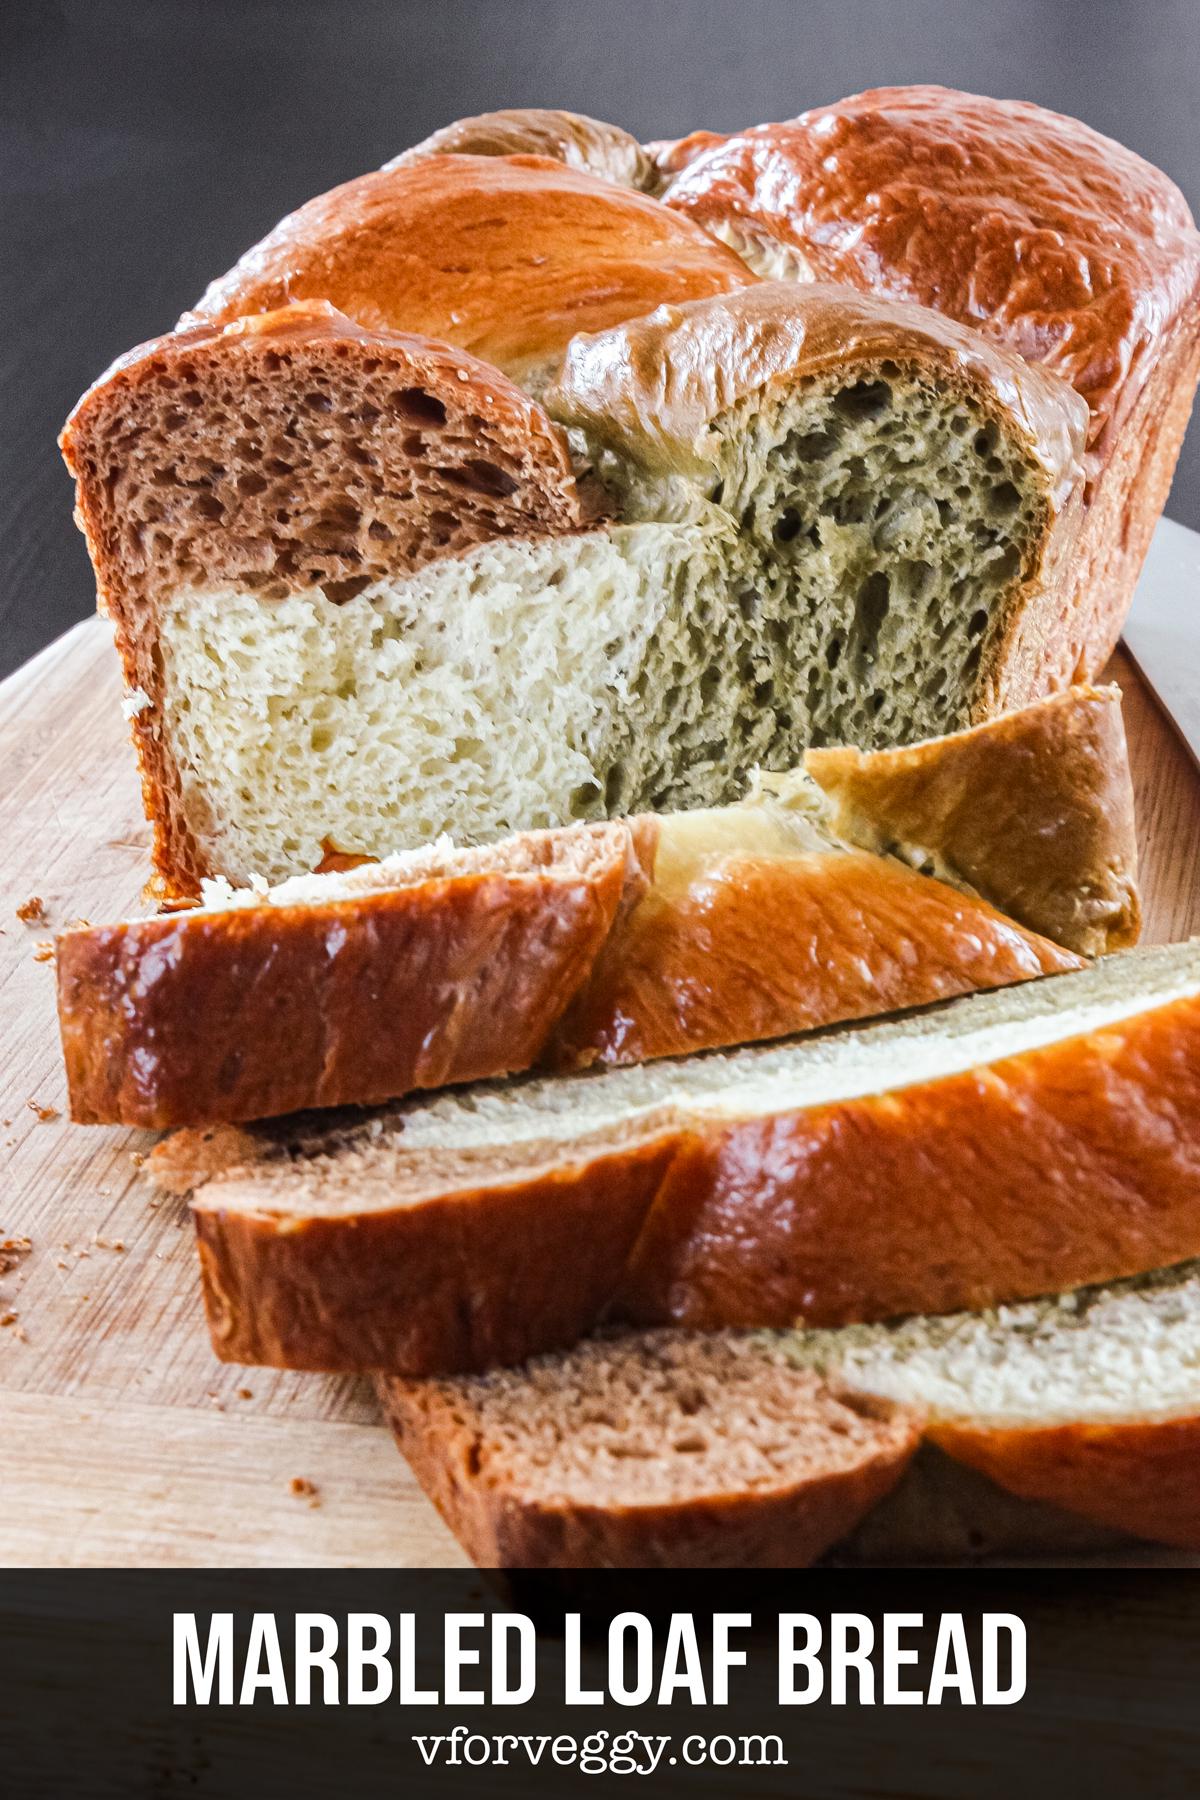
- Let the bread cool in the pan for 10 minutes. Then gently run a knife along the edges to loosen the bread. Transfer to a wire rack to cool completely.
Notes
- (*) If using salted butter, increase amount to 34 gram, but don't use the 4 gram salt.

Comments
Such a great recipe for marbled bread! This will be a hit at parties, indeed!
I love how you didn't just use food coloring, but different flavors to color the bread! I can't wait to try making this at home!
I grow up listening to my Mom telling us not to buy all the colorful snacks/breads/cakes/e.t.c. since they are not healthy, and she would instead promise to make the healthy version herself. So it's ingrained in me by now, and I avoid food coloring like the plague. :)
What a fabulous looking loaf of bread! This is a wonderful recipe.
What a beautiful loaf. It would be great for serving up at a dinner party.
What a fun way to make bread. I like that I can add other natural foods to change the color of this bread recipe.
Indeed, sometimes I also use mashed sweet potatoes, mashed butternut squash, mashed pumpkins, carrot juice, beet juice, just to name a few. :)
Love this. It looks so pretty.
Leave a comment